
Popup Cardboard House
Popup Cardboard House
Our storeroom gets occupied with various cardboard boxes. Their number goes on increasing after every purchase. Either they keep on adding to the shelves of your storeroom or ends up in recycling. It would be interesting to know that these empty cardboard boxes can be used to make different crafts for kids. Turning them into something functional is a fascinating art. It engages your kids and saves your money. Moreover, you can customize the projects according to the wish of the children. Making a popup cardboard house is one of the creative things. You need to purchase nothing from the market rather use some of the common supplies available with you. The main thing you need is leftover custom printed cardboard boxes. Making a popup cardboard house is a fast and mess-free project. You do not have to face any complex architectural problem while making it. Engage your kids with you and see how much fun they have.
Supplies Required:
• Cardboard boxes
• Box Cutter
• Scissors or a craft knife
•Tape or a strong adhesive
• Paints, markers, crayons and other embellishments for decoration
• Cardboard boxes
• Box Cutter
• Scissors or a craft knife
•Tape or a strong adhesive
• Paints, markers, crayons and other embellishments for decoration
Step 1: Find a Right Sized Cardboard Box

The first step of the process is to find a perfect sized cardboard box according to your requirement. You can search for your storeroom or a near grocery store. For making a large popup house, large-sized printed cardboard boxes are required. The one from a large HDTV LCD or a freezer works well. They are made from corrugated packaging which is a highly durable material.
Step 2: Download a Template for a Popup House
Making a popup cardboard house requires a different process. It is not like a traditional house making project where different parts of the house are cut and glued together to give them the required shape. Nothing has to be cut here. Rather clear cut-outs are made and folded in a particular manner. For this, you have to download a template of a popup cardboard house. Print it on a piece of paper. It is better to see some tutorial to understand the process.
Step 3: Remove the Lid and Base of the Box

Most of the cardboard boxes printed come up with an attached lid and base. Remove both of them. Use sharp scissors or a craft knife to cut the base and lid. Beware of rough edges. Ensure a proper cutting to obtain a good finish.
Step 4: Make Important Cut-outs

Now you have to make the house on the same pattern as that of a little paper model. Although you may implement various innovations it is recommended to keep it easy at the start. Make easy cutouts for doors and windows. You need a sharp box cutter for it. Never hand it over to your kids as it may harm them. A half-rounded window with a popup cabinet looks very attractive and functional. Children love to have them for playing. Make sure that none of the parts should be cut. Rather all of them should remain attached to the cardboard box to pop-up at the end.
Step 5: Fold it up!

The last step of the process is to fold the cuts correctly. This step needs to be carried with great care as your entire popping up depends on it. As cardboard is difficult to fold so it is suggested to practice it first on a little piece of paper. This helps you in getting command over the process.
Step 6: Popup and Decorate

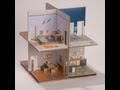
This step is the most interesting one for your kids. Make your cardboard house to pop up. Ask your kids to color and decorate it in the way you want. Use markers, poster paints, spray paints, crayons, glitter, or whatever you like. You may also cover its parts with a colored paper or a fabric. Place a roof in a slanting way at the top of the house to get a final look.


No comments: